.png?width=552&height=88&name=aptitude8%20-%20standard%20-%20White%20-%20LG%20(1).png "aptitude8 - standard - White - LG (1)")

.png?width=750&height=405&name=Building%20a%20Scalable%20HubSpot%20Strategy%20(2).png)


.png)
.png?width=735&height=470&name=Uber%20Freight%20Play%20Image%20(2).png)
Check out this video case study where we helped a client save over $77,000 by switching to HubSpot.
Marketo vs HubSpot
Differences Between the Platforms
As marketing automation platforms, Marketo & HubSpot share similar functionality, but use different terms for these features. Here is a brief guide to align Marketo tools with its HubSpot analog. Your Marketo instance may differ slightly from what’s shown here.
Marketo has icons for each of their tools. For some tools, the icon indicates whether the tool is active (yellow) or inactive (gray). Use these to your advantage to avoid migrating inactive assets over to HubSpot.
Icons and Terminology
|
|
|
 Active Trigger
 Inactive Trigger
|
Marketo Icon |
Marketo Tool |
Corresponding HubSpot Tool |
|
|
Triggers |
Workflows |
|
|
Batch or Smart Campaign |
Workflows or Form Automation |
|
|
|
Marketing Email |
|
|
Email Template |
Marketing Email Templates |
|
|
Form |
Forms |
|
|
Landing Page |
Landing Pages |
|
|
Landing Page Template |
Design Tools, Templates, and Themes |
|
|
Smart List |
Active Lists |
|
|
Static List |
Static Lists |
|
|
Program |
Campaigns |


Where to Find Features
There are some Marketo features that do not have a HubSpot counterpart and vice versa. If you encounter any of those during your migration project, you’ll need to figure out the best way to handle them.
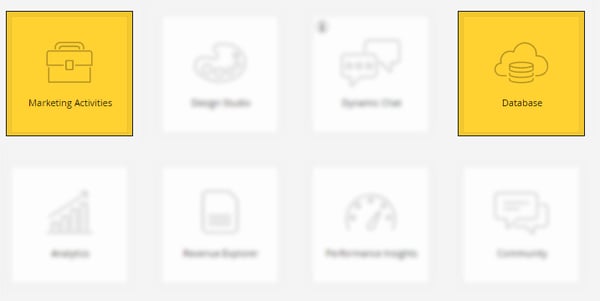
Most of your time in Marketo will be spent in the Marketing Activities and Database areas of their interface.
Asset Types
The very first task to prepare for the migration should be documenting and taking an inventory of every asset to be migrated. We recommend creating a Google Spreadsheet so all stakeholders can collaborate and add their items to the document.
We created a template you can use as a starting point. Get it here.
Each tab has a column for Status. Use these values to denote where each item is at in the process. It’s always better to err on the side of caution and include more details than you believe necessary.
Here’s how to use each tab in the template:
Users, Properties, & Forms
Users: To document which users should be added to HubSpot along with their team and permission set.
Properties: This will be one of the largest tabs in the spreadsheet. If needed, add a separate tab for each object. This will document which Marketo properties need to be recreated in HubSpot and which HubSpot property it will map to:

In addition to the property names and internal names, there are also columns to denote which object the property belongs to, what type of property it is, and a column for Options to use for picklist and checkbox properties.
Forms: This tab should document each form to be migrated over along with the users to which notifications should be sent. Also, outline the form fields and whether they’re required or hidden.
Lists & Workflows
Lists: Use this sheet to inventory the lists to be migrated to HubSpot. Make sure to link the list name to the actual list in Marketo, and note whether the list is an Active or Static list. If you’re using a folder structure in Marketo, that can be replicated in HubSpot with List Folders. Add any dependencies, such as workflows, to the Dependencies column as well.
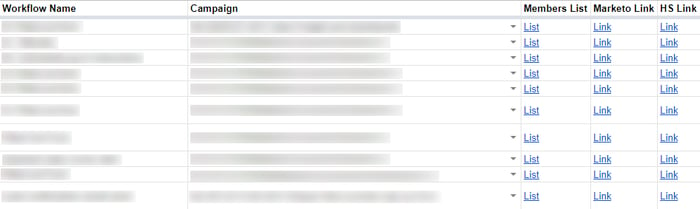
Workflows: This will be another robust tab. The Workflow Name and Campaign columns should be the exact name and campaign from Marketo. Use the Members List column to link to the Marketo list of currently active members in the workflow.
HubSpot Account Setup
Once each asset to migrate is fully documented in the spreadsheet, it’s time to roll up your sleeves and get started. One of the first tasks in HubSpot is to configure a few global settings.
Global Portal Configuration
To configure the account defaults, navigate to Settings → Account Setup → Account Defaults. Here you’ll see several tabs of settings.

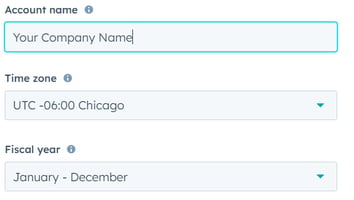
The General Tab will ask for basic information about your company, such as name, domain, and street address, along with a few other items:
The Security Tab has options for account security, such as configuring single sign-on (SSO), requiring two-factor authentication (2FA) and viewing activity logs and history.
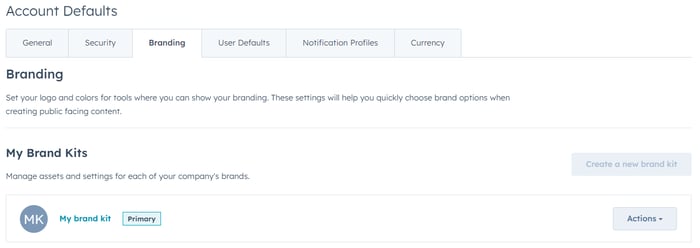
On the Branding tab, you can add several brand logos (horizontal, vertical, icon only, full-color, black & white, etc.), brand colors, and themes to be used throughout the portal via a Brand Kit.
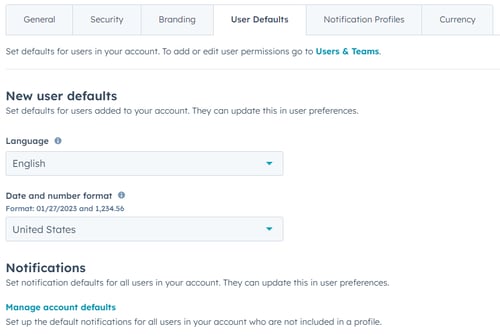
On the User Defaults tab you’ll be able to assign some basic settings for all new users.
Disregard the Notifications Profiles tab for now.
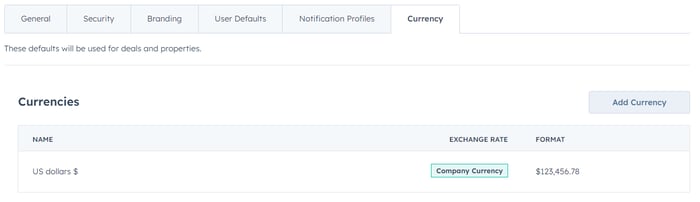
Finally, the Currency tab is where you define the currencies your company accepts and also set the current exchange rate. HubSpot will use the exchange rate to convert foreign currencies to the default currency equivalent.
Tracking & Analytics
Next, click into the Tracking & Analytics → Tracking Code section in the left navigation on the settings page:
![]()
This is where you’ll find the HubSpot tracking code. Be sure to add this to any external page you want HubSpot to track.
Here, the Advanced Tracking tab is where you’ll need to spend some time.
![]()
Make sure to add any domain you want tracked to this list. If it’s an External domain (not hosted by HubSpot), be sure to add the tracking code to it.
The next set of options should be fine with the default settings, but make sure these two are turned on:
![]()
Automatic Cross-Domain Tracking is critical if you have an externally hosted domain. Without that turned on, traffic from those domains back to a HubSpot-hosted domain will default as Direct, stripping out the source data.
And Bot Filtering is naturally essential. Feel free to adjust the others as needed for your setup.
Finally, click over to the Analytics Views tab:
![]()
Here, you can add specific filters to reports to just see data for that filter instead of every domain combined into a single view.
Even though there won’t be any data flowing in right away, it is important to add these views now because they are not retroactive, meaning HubSpot will only start processing data from the date the views were added. Any traffic from before cannot be filtered out.
Global Email Settings
Next, head down to the Tools section and go to Marketing → Email. This is where we’ll set some global defaults for email marketing, such as subscription types, colors, and footers.
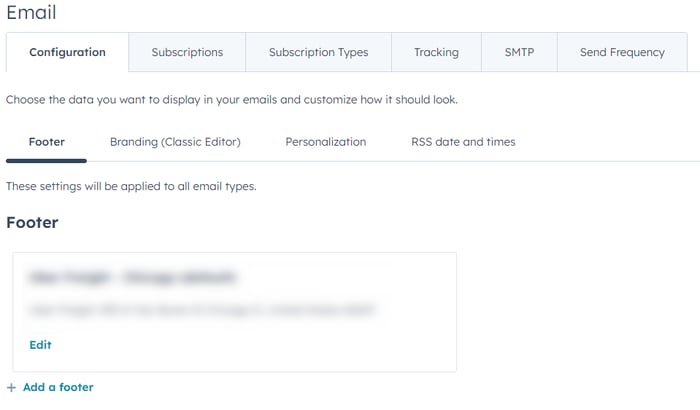
Each of the tabs are fairly self explanatory, so we won’t dive too much into the weeds here. The one area to call out, though, is Subscription Types.

Be sure to add each subscription type in Marketo to this list in HubSpot. Every marketing email will require a subscription type, so make sure these are defined properly before migrating emails over.
Object Configuration
This step isn’t required, but we do recommend customizing the properties and views for the objects in the HubSpot CRM.
Navigate to Settings → Data Management → Objects
Here you’ll see a list of the standard HubSpot object, along with any custom objects you may have created for the migration:
- Contacts
- Companies
- Deals
- Tickets
- Etc.
These objects share similar views and settings, so we’ll use the Contact object here as the same steps apply for the others.

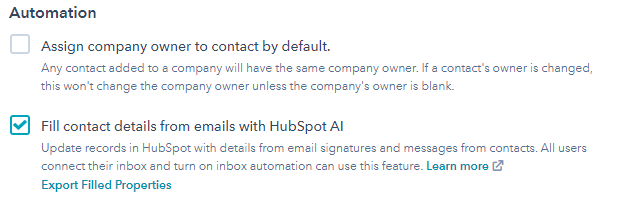
The Setup tab lets you customize the properties that appear on the “Create Contact” form if someone were to manually add a contact to HubSpot.
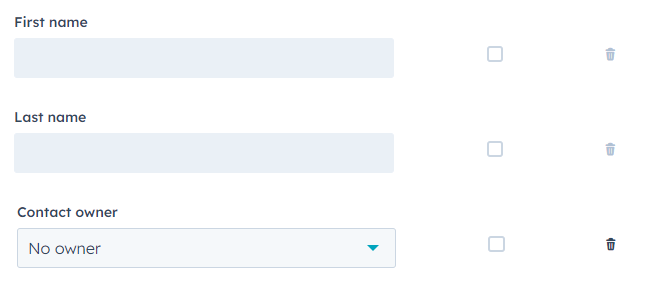
Here you’re able to add, remove, and require properties you’d like users to fill out when manually adding a contact. The use case for each business is unique, but best practice here is to ask for the information needed to successfully interact with this contact and require the information that’s critical for a successful relationship.
The final section of the Setup tab has two checkboxes. Both are self-explanatory in what they do.
The Associations Tab allows you to define custom object associations beyond the HubSpot defaults and to create association labels as needed.
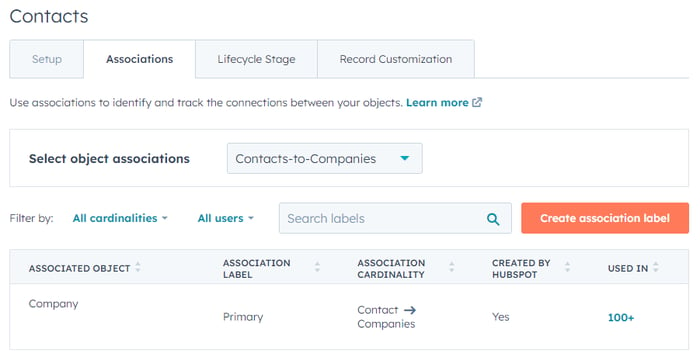
Example association labels might include:
Contact → Company: “Primary Point of Contact”
Contact → Deal: “Decision Maker”
Contact → Deal: “Accounts Payable Contact”
Use the Lifecycle Stage tab to customize Lifecycle Stage for contacts in HubSpot.
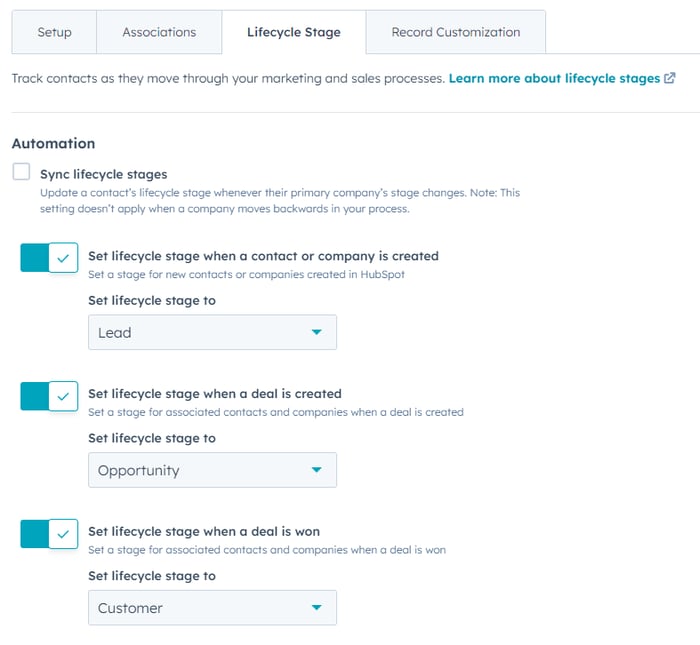
These should mirror the stages from Marketo. Or, use this chance to revisit your lifecycle stage strategy and start fresh.
Finally, the Record Customization tab allows users to outline specifically how an object record page should look.
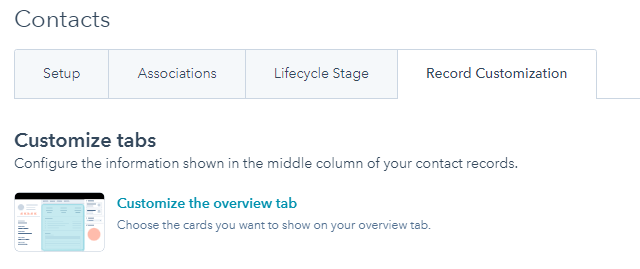
You can customize both sidebars and manage the default properties shown for different users and teams by default.
Spend some time here and make sure each object is configured to show the data points each team will need for easy access.
Domains & URLs
One final global setting is at the very bottom of the sidebar. Click into Tools → Website → Domains & URLs

While it’s not necessary to configure these right away, it’s a good time to figure out how you want to host content on HubSpot. If you’ll only be hosting landing pages and emails (where the web version links to) in HubSpot, but have your main website elsewhere (such as WordPress), you’ll need to decide on subdomains to host landing pages and emails on. Here are some popular options:
- Info.yourwebsite.com
- Content.yourwebsite.com
- Insights.yourwebsite.com
- Go.yourwebsite.com
- Downloads.yourwebsite.com
- Resources.yourwebsite.com
- Email.yourwebsite.com
This is also the section you'll need to revisit once migration is complete to configure URL Redirects to ensure old Marketo landing pages will redirect to their new versions on HubSpot.
Users, Teams, and Permissions
In HubSpot, navigate to Settings → Users & Teams. Before adding users, click to the Teams tab and set up any teams you’ll need in the CRM.
Think of a Team as a category of users with similar roles, such as Sales, Service, Content Creators, Email Marketing, Admin, Sales Managers, etc.
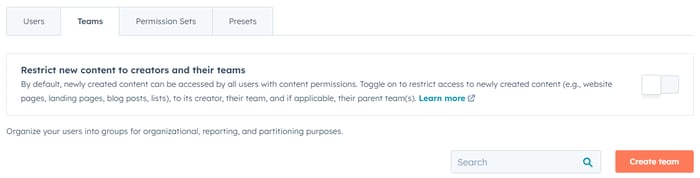
You can always add teams later. This should just be an initial starting point.
Next, click over to the Permission Sets tab. HubSpot already has a handful of pre-built permissions sets to select from when adding a user:
- View Only
- Standard User
- CMS Developer
- Content Marketer
- Marketing Manager
- Sales Manager
- Sale Rep
- Service Manager
- Service Rep
- Super Admin
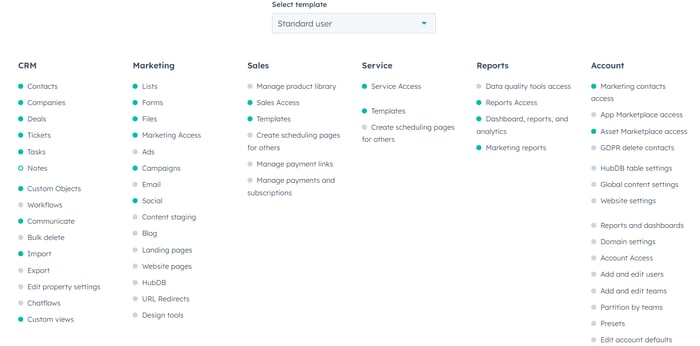
If these suit your needs, then you can skip creating additional Permissions Sets. Otherwise, go ahead and add custom ones to suit your requirements.
Templates & Themes
Website & Landing Pages: Before creating website or landing page templates, you’ll need to build out a theme file and upload it to the Themes page under Settings → Tools → Website → Themes.
For the most part, one of the default themes should be enough to get started. Click into it and start customizing global colors, fonts, header images, typography, buttons, forms, etc.
After the theme is customized (or uploaded), head over to Design Manager and have your developer replicate the Marketo Landing Page Templates as HubSpot Templates.
For help with this task, reach out to Aptitude 8.
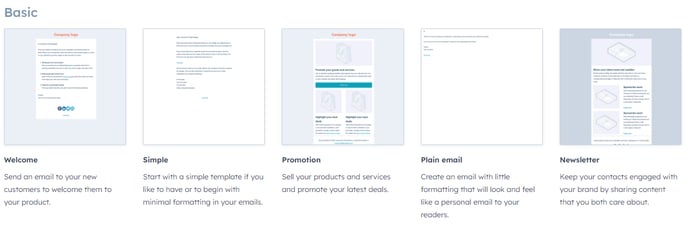
Email Templates: Creating an email template is more straightforward in HubSpot as they provide a couple dozen or so predefined templates to start with. From there, you can customize the look and feel of the email using your brand, add custom modules created in Design Manager, and save the entire thing as its own template for use in the future.
To get started, head over to Marketing → Email.
Click the “Create Email” button.

Choose either Regular or Automated and then you’ll be asked to select a template from one of HubSpot boilerplate drag and drop templates.
See how to create an email in the drag-and-drop editing interface, and how to save that email as a template for future use.
For instance, rather than adding points whenever someone fills out a form, add those points only if the form submission is in the last 30 days. Thus, once 30 days have passed, those points will go away.
Active & Statics Lists
Build lists (Active & Statics): Go back to the inventory spreadsheet you created and find the Lists tab.
The criteria for active lists is found in two places in Marketo: on the Status tab of the list overview page, and a detailed breakdown on the Smart List Tab:
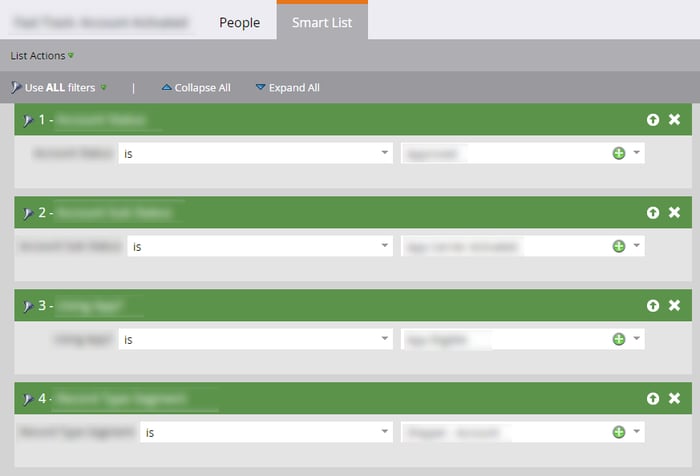
Take note of the “Use ALL Filters” description just under the List Actions option. Lists may instead say “Use Advanced filters” with custom rules.

To replicate those in HubSpot, use combinations of the AND and OR criteria in active lists. For each instance of the word “or” in Marketo, you’ll need an OR branch in the HubSpot list. Using the above example, the HubSpot active list would have two filters: 1 and 2 and 3 and 4 and 6 OR 1 and 2 and 3 and 5 and 6.
For Static lists, simply click List Actions → Export List:
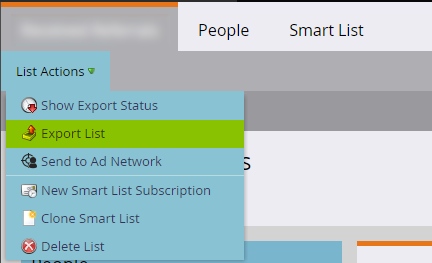
This will begin the export process in Marketo, which could take anywhere from a few minutes to several hours depending on the size of the list. Don’t worry, though, you can navigate away and come back later. The export will process in the background without fear of losing progress.
Once the export is ready, download it to your computer, and follow these steps to upload a static list to HubSpot.
Automation
This area is likely where you’ll spend a bulk of the migration time: replicating automation from Marketo to HubSpot.
Workflows in Marketo (called Smart Campaigns or Triggers) share a similar layout to Smart Lists with one exception, the Flow tab:

Here’s how each tab translates to HubSpot functionality.
- Smart List → Workflow Triggers
- Flow → Workflow Actions
- Schedule → Re-enrollment Settings & History
In HubSpot, create a workflow for each one outlined in the inventory spreadsheet. Again, we recommend using the exact name from Marketo in HubSpot. You may encounter several workflows that all share the same name, but are associated with different campaigns (such as “Filled Out Form”). In those cases, append any applicable descriptive detail to the workflow name and/or description in HubSpot.
When it comes to actually migrating 1:1 functionality over, HubSpot and Marketo are vastly different. For the most part, there’s a HubSpot workflow action that does the same thing as the corresponding one in Marketo; they’re just labeled differently.
Here are a few caveats you may encounter that do not have obvious alternatives.
Change Program Status: This action does not have a HubSpot counterpart.

The closest HubSpot functionality to a Program Status is the Campaigns tool. This action cannot be replicated in HubSpot. Instead, assign the workflow to the corresponding campaign. This will then attribute any activity from associated emails, lists, and other assets to influenced revenue and created contacts.
Change Data Value: In Marketo, these are essentially self-contained IF/THEN branches, which HubSpot does not have. They first check to see if a property contains a certain value, and then update it based on that check, all within the same action.
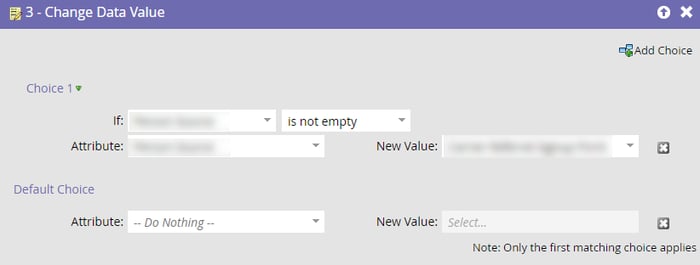
To replicate this in HubSpot, create a logic branch and use the go-to action feature to jump to the next part of the workflow once complete.
Request Campaign: In Marketo, Campaigns are equivalent to workflows in HubSpot. So the Request Campaign action is analogous to the HubSpot action, “Enroll in another workflow.”

Campaign is Requested (Trigger Criteria): You may encounter this on the Smart List (HubSpot workflow triggers) tab in Marketo.
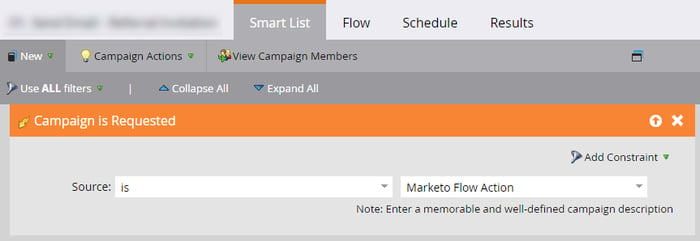
In these cases, this Marketo flow doesn’t have any enrollment criteria because people are being enrolled from other Marketo flows. Notice the name of the trigger “Campaign is Requested” and the source is “Marketo Flow Action.”
This is the inverse from the previous Request Campaign action where that Marketo action is enrolling people into this flow.
In HubSpot, there are two ways to do this, one with the new Enrollment Triggers, and the other with the legacy triggers.
New Enrollment Triggers: Click the Setup Triggers and scroll down to Workflows and choose Enrolled in Workflow:
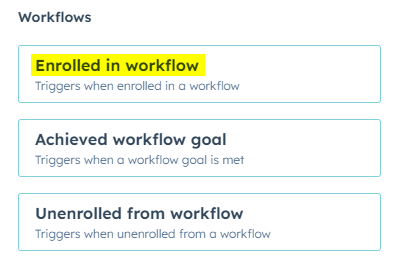
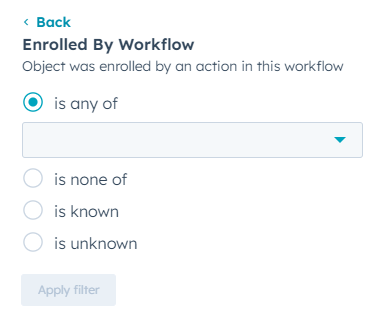
The select “Enrolled By Workflow”
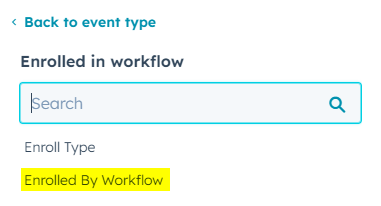
Then type in the name of the workflow(s) that will enroll into this one and click Apply Filter:
Legacy Enrollment Triggers: If your portal is using the legacy triggers, don’t add any enrollment criteria:
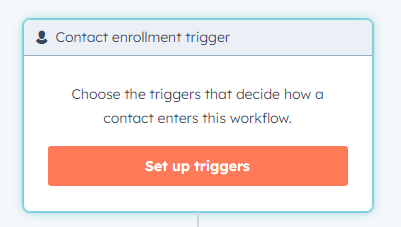
Make sure manual enrollment is turned on by clicking on the Set Up Triggers button and then click to the Re-enrollment tab:
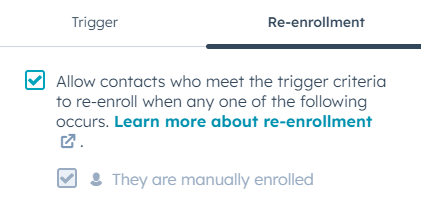
Ensure both boxes are checked and you’re all set.
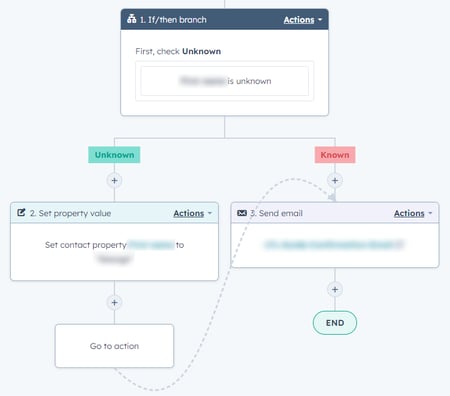
Remove From Flow: This Marketo action will remove a person from a given flow.

In HubSpot, use the Goals feature to accomplish this. If the flow in question is the current workflow, then use the previous actions to infer the criteria that must be met for a contact to hit the “Goal” and be automatically unenrolled from the workflow.
If the flow is referencing a different workflow, then go to that one and set the goal criteria accordingly.
If you haven’t already migrated an initial batch of contacts over, go ahead and do that now. Or, create temporary contacts for testing purposes in the Sandbox. Update their contact records with information that would qualify them to enroll in workflows and send out applicable emails.
Once you’re satisfied that migrated assets will operate successfully in HubSpot, and any needed changes have been made in Production, it is safe to move forward with live data.
Exporting Marketo Data
Migrate Historical Data: Depending on the size of your Marketo database, there are two options:
- Export the entire database of Contacts, Companies, and Opportunities with all columns, and export lists with just the visible columns.
- Export the entire database with the visible columns and lists with all columns.
Option 1 is ideal for small databases. Everything needed will be in a handful of files to import into HubSpot with all properties.
Option 2 is ideal for a large database as export times in Marketo can take many hours if you include all columns.
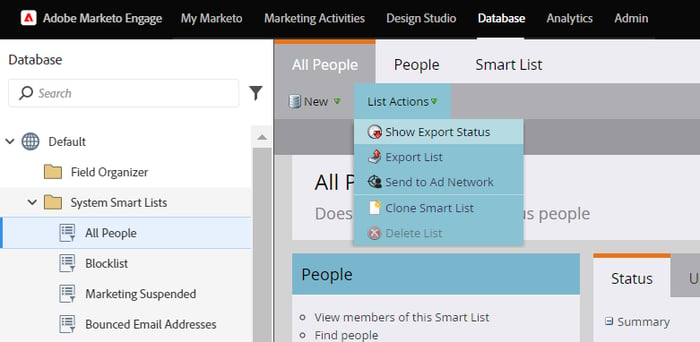
For either option, head over to Database → System Smart Lists → All People
Then click List Actions → Export List.

Suppression Lists
Workflow Suppression Lists: Remember adding the Members List to the Worfklows tab of the inventory spreadsheet? Now it’s time to download those lists.When downloading the members lists, give the files an appropriate name to align with the corresponding HubSpot workflow. You’ll add them to those workflows as a Suprression List, meaning anyone on those lists will not run through the workflow even if they meet the trigger criteria.
Once the Members Lists are downloaded from Marketo and the files are named appropriately, upload them one at a time into HubSpot. With each list, find it’s corresponding HubSpot workflow and click into the Settings tab and go to Un-enrollment and Suppression:
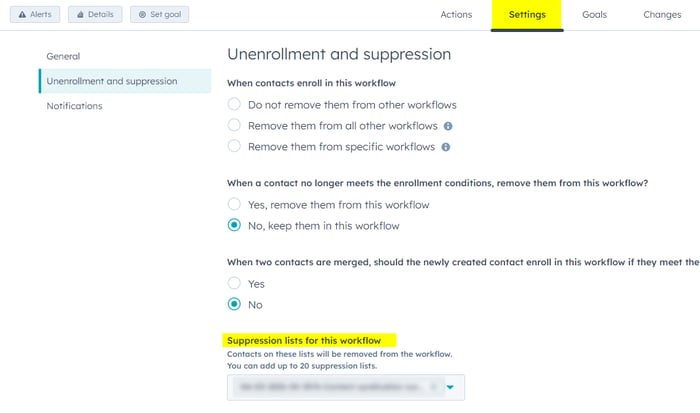
Under “Suppression Lists for this workflow” at the bottom, find the list you uploaded for this workflow and add it as a suppression list.
Go-Live
Making the Cutover
Timing the Cutover: Depending on when your Marketo license is up for renewal, you may be able to leave Marketo running after the go-live. If that’s the case, we suggest letting contacts who are currently active in a Marketo Smart Campaign (workflow) to finish in Marketo.
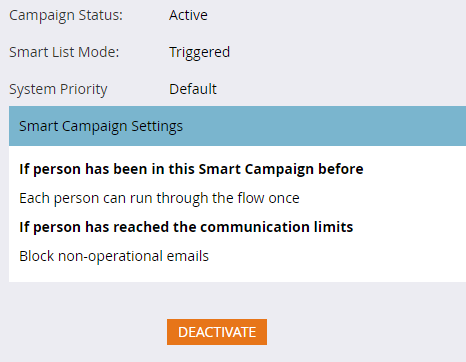
To see if there are any active leads in a Marketo Smart campaign, find the Status tab on the overview page. Here, you can see the total number of people who have gone through the flow (Members), and how many are currently active in it (People in Wait Step):
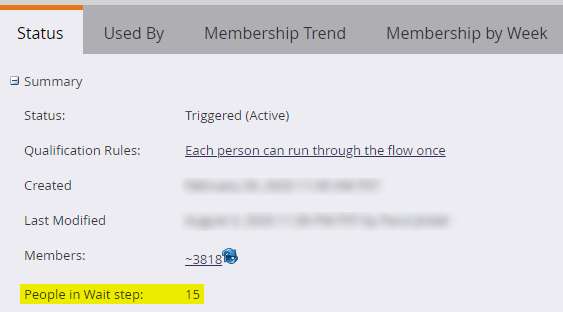
If there are people in the wait step, simply remove the Smart List criteria so nobody else gets enrolled. Otherwise, you can deactivate the flow via the Schedule tab and clicking the Deactivate button.
If your Marketo license will expire and not allow smart campaigns to remain active, then you’ll need to decide what course of action to take regarding contacts currently active in Marketo flows. Ideally, it’ll be small enough to handle on a case-by-case basis.
Final Steps
These last two items need to happen essentially simultaneously. If not, there’s a risk that Marketo pages and forms could still be accessed and filled out, thus leaving those contacts in a state of limbo during the transition.
Before starting the step, make sure you’re able to get the DNS records for your domain changed and set up URL redirects in a timely manner.
DNS Updates: In the Domains & URLs step above, you should have decided what URLs to use to host email and landing pages in HubSpot. If those are the same as Marketo, simply change those DNS records.
If you’ll be hosting HubSpot landing pages on a different subdomain than Marketo’s, still make those changes to the DNS. But you'll also need to add a Redirected Domain for the (soon-to-be) old Marketo subdomain:

Redirects: Once the DNS records are live on HubSpot, it’s time to map the old Marketo URLs to their HubSpot equivalents.
Head over to the Redirects Tab on the same settings page:

Use this tool to add redirects to HubSpot.
Adding a redirect is fairly straightforward. Click the “Add URL Redirect” button and this form will appear on the right:
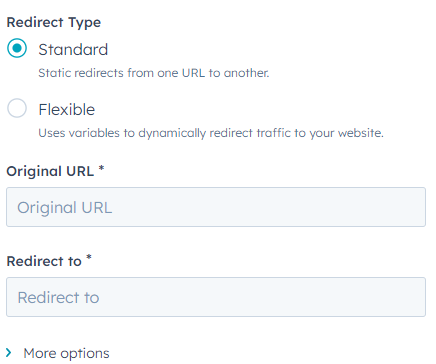
For the most part, you’ll be adding Standard Redirects for each page. Flexible Redirects are beyond the scope of this guide and should be handled by someone familiar with advanced URL redirects.
Leave the options under More Settings as their default.
Make sure to use the full Marketo URL in the Original URL field and the full HubSpot URL in the Redirect To field. This ensures accurate mappings.
Once the redirect is added, it can take up to 5 minutes to work. Be sure that each redirect works as expected. You may need to use a private browsing window to bypass local cache settings in the browser.
How Much Are You Spending on CRM Management and Support?
In this blog, we'll take a look at the price tag of supporting your CRM internally, where that cost comes from, and how you can reduce thes...

What's the Real Cost Difference Between HubSpot vs Salesforce Pricing?
Discover the true cost of ownership HubSpot and Salesforce with our 2024 analysis of 332 professionals covering implementation and maintena...